UI State Machine with only HTML and CSS
This post shows a reusable general purpose state machine built with HTML and CSS only. No javascript used here. State machines are not new. But they have gained popularity recently for managing state in frontend UI. Especially with the widespread use of XState.

This design uses the radio-reset-controller to hold state. It is a radio button that is default checked, reset remotely, and connected using an empty form tag. This is not the same as the checkbox hack written about before.
Traffic Light State Machine
In any explanation of state machines you are obligated to include the classic traffic light example. Below is a working traffic light example that uses the state machine described here. Clicking on "NEXT" advances the state. The code in this pen is post processed from the state machine template to fit in a pen. A more readable version is show further on.
More Useful Example
For a more practical example below is a simple page with a heading and a table. There are two states (A and B). There is a button below the title as well as one inside a cell of the table that can both change the state. The state change drops a column from the table, adds a row, changes a cell content, and changes text in the page heading at the top of the page. Similar examples have been demonstrated before using the checkbox hack, but they are tightly coupled to the structure of the markup. In this example the state can be controlled from anywhere on the page and change the state of almost anything on the page.
General four State FSM
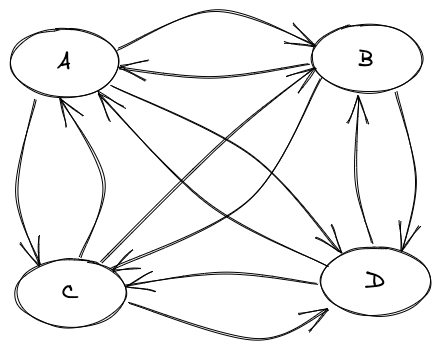
The goal is a general purpose component to control the desired state of the page. "Page state" refers to the desired state of the page and "machine state" refers to the internal state of the controller itself. The diagram in Figure 1 at the top of the post shows this generic state machine.
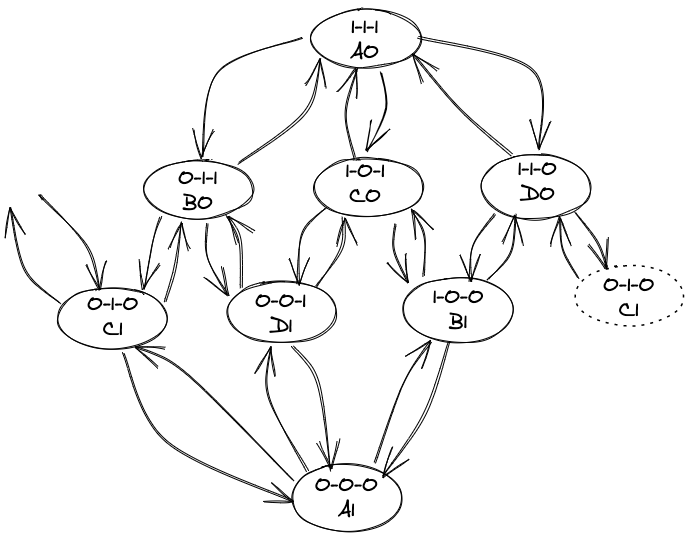
It is built using three of the Radio Reset Controller. Adding three of these together forms a state machine that has 8 states (3 independent radio buttons either on or off). This machine is shown below.

The "machine states" are written as sum of the three radio buttons (i.e. M001 or M101). To transition from the initial M111 to M011 the radio button for that bit is unset by clicking on another radio button in the same group. To transition back the reset button for the form attached to that bit clicked which restores the default checked state. Although this machine has 8 total states only certain transitions are possible. For instance there is no way to go directly from M111 to M100 because it requires two bits to be flipped. But if we fold these 8 states into 4 states so that the page state for A shares two machine states M111 and M000 then their is a single transition from any page state any other page state.
Reusable Four State Component
For reusability the component is built with nujucks template macros. This allows it to be dropped into any page to add a state machine with the desired valid states and transitions. There are 4 required sub-components:
1. Controller2. CSS Logic3. Transition Controls4. State Classes
Controller
The controller is built with three empty form tags and three radio buttons. Each radio button is default checked. Each is connected to one of the forms and they are independent of each other with their own radio group name. These inputs are hidden with display:none because they are are not directly changed or seen. The state of these three make the machine state. This controller is placed at the top of the page.
{% macro FSM4S_controller()%}<form id="rrc-form-Bx00"></form><form id="rrc-form-B0x0"></form><form id="rrc-form-B00x"></form><input data-rrc="Bx00" form="rrc-form-Bx00" style="display:none" type="radio" name="rrc-Bx00" checked="checked" /><input data-rrc="B0x0" form="rrc-form-B0x0" style="display:none" type="radio" name="rrc-B0x0" checked="checked" /><input data-rrc="B00x" form="rrc-form-B00x" style="display:none" type="radio" name="rrc-B00x" checked="checked" />{% endmacro %}
CSS Logic
The logic that connects the above controller to the state of the page is written in CSS. The checkbox hack uses a similar technique to control sibling or descendant elements with a checkbox. The difference here is that the button controlling the state is not tightly coupled to the element it is selecting. The logic below selects based on the "checked" state of each of the three controller radio buttons and any descendant element with the class "M000". This state machine hides any element with the class of M000 by setting display:none !important. Using !important is almost never a good idea. It could be removed here and this would work in most cases because the selector has high specificity.
{%macro FSM4S_css()%}<style type="text/css">/* Hide M000 (A1) */input[data-rrc="Bx00"]:not(:checked)~input[data-rrc="B0x0"]:not(:checked)~input[data-rrc="B00x"]:not(:checked)~* .M000 {display: none !important;}/* one section for each of 8 Machine States */</style>{%endmacro%}
Transition Control
To change the state of the page requires a click or keystroke from the user. To change a single bit of the machine state you either click on a radio button that is connected to the same form and radio group of one of the bits in the controller. To reset it the user clicks on a reset button for the form connected to that same radio button. The radio button or the reset button is only shown depending on which state they are in. A transition macro for any valid transition is added to the HTML. There can be multiple transitions placed anywhere on the page. All transitions for states currently inactive will be hidden.
{%macro AtoB(text="B",class="", classBtn="",classLbl="",classInp="")%}<label class=" {{class}} {{classLbl}} {{showM111_A()}} "><input class=" {{classInp}} " form="rrc-form-Bx00" type="radio" name="rrc-Bx00" />{{text}}</label><button class=" {{class}} {{classBtn}} {{showM000_A1()}} " type="reset" form="rrc-form-Bx00">{{text}}</button>{%endmacro%}
State Class
The three components above are sufficient. Any element that depends on state should have the classes applied to hide it during other states. In practice this gets messy. The following macros are used to simplify that process. If a given element should be shown only in state A the {{showA()}} macro adds the states to hide.
{%macro showA() %}M001 M010 M100 M101 M110 M011{%endmacro%}
Putting it all together
The markup for the traffic light example is shown below. The template macros are imported in the first line of the file. The CSS logic is added to the head and the controller is at the top of the body. The state classes are on each of the lights of the traffic-light <div>. The signal that is lighted has a {{showA()}} macro while the off version of signal has the machine states M000 and M111 for classes. The state transition button is at the bottom of the page.
{% import "rrc.njk" as rrc %}<!DOCTYPE html><html lang="en"><head><meta charset="UTF-8" /><title>My New Pen!</title><link rel="stylesheet" href="styles/index.processed.css">{{rrc.FSM4S_css()}}</head><body>{{rrc.FSM4S_controller()}}<div><div class="traffic-light"><div class="{{rrc.showA()}} light red-light on"></div><div class="M111 M000 light red-light off"></div><div class="{{rrc.showB()}} light yellow-light on"></div><div class="M100 M011 light yellow-light off"></div><div class="{{rrc.showC()}} light green-light on"></div><div class="M010 M101 light green-light off"></div></div><div><div class="next-state">{{rrc.AtoC(text="NEXT", classInp="control-input",classLbl="control-label",classBtn="control-button")}}{{rrc.CtoB(text="NEXT", classInp="control-input",classLbl="control-label",classBtn="control-button")}}{{rrc.BtoA(text="NEXT", classInp="control-input",classLbl="control-label",classBtn="control-button")}}</div></div></div></body></html>
Extending to more states
The state machine component here includes up to four states. In practice this is a useful result because a lot of use cases can be handled by this. You can often use multiple independent state machines on one page. This technique can be used to build a state machine with more states. The table below shows how many page states can be built by adding additional bits. Notice that even number of bits do not collapse efficiently which is why 3 and 4 bits are both limited to 4 page states.
| Bits (rrc's) | Machine States | Page States |
|---|---|---|
| 1 | 2 | 2 |
| 2 | 4 | 2 |
| 3 | 8 | 4 |
| 4 | 16 | 4 |
| 5 | 32 | 6 |
Accessibility... or should you do this?
This pattern works, but I am not suggesting it should be used everywhere. In most cases Javascript is the right way to add interactivity to the web. I realize that in posting this it might get some heat from accessibility and semantic markup experts (if it gets notice by anyone that is). I am not an accessibility expert, but implementing this pattern can unintentionally create problems. But I have not seen anyone write about how to do this and I think the knowledge useful. Even if it is only appropriate occasionally.
Github
The code here is posted on Github at https://github.com/rbethel/radio-reset-controller.