Authentication for a Gatsby React GraphQL App
Introduction
Authentication is a critical function for any web app. There are many general resources on the topic. This is not an "everything you need to know about" post. I will show one authentication solution for an SPA (single page app) using Gatsby and React with a graphQL API backend. It solves most of the problems specific to SPA stateless authentication.
TL;DR
JSON Web Tokens allow stateless authentication for SPAs. They can create security and usability problems if not used properly. Splitting the JWT (JSON Web Token) into two cookies protects against the whole token being stolen. A client side permissions object is placed in local storage for UI purposes only. The authentication token itself does not use local storage for security purposes. An additional permissions token is used for blacklisting tokens, CSRF protection, and expiring tokens.
Basic Authentication with JWT (the ideal case)
For this SPA the entire app is downloaded from static hosting and the backend API is used to authenticate a user and send the needed data. This allows the API server to handle requests as stateless. Session cookies could be used for authenticating, similar to a server-rendered app, but that would defeat some advantages of an SPA. The most popular solution is JSON Web Tokens or JWT. A JWT is a three-part signed token. It includes a header with some configuration information, a payload with the payload you define, and a signature. Each part is base64 encoded and separated by a period. Typically the payload is sent un-encrypted (although Base64 encoded) meaning it can be read by anyone who can access it. The signature is a cryptographically secure hash of the payload using a key that only the server has. This means that the client can read the payload (which is useful) and anyone who can read it can change the payload (which is not useful). But even if the payload is changed the signature will no longer match the modified payload.
In the simplest implementation, the user would log in to the API and receive a JWT token where the payload is the user ID. The token would be stored on the client in local storage or in a cookie. The client keeps that token and the server does not need to store it. Anytime the user sends the token the API uses its private key to check the signature and then it knows that the user listed in the payload is authenticated. Authentication Done! But in practice, this simple implementation creates many problems that need to be solved. For a more complete explanation of JWT's I recommend jwt.io (or here).
The problems (and how to fix them)
A successful implementation should consider the following:
Stolen Token
- If a valid JWT token is stolen it can be used to authenticate as that user. It could be stolen through cross-site scripting (XSS), SQL injection, or some rogue javascript 3rd party asset. If these JWT tokens never expire and there is no way to invalidate them it is like making a copy of your house key for every guest you ever have and never even asking them to throw it away.
CSRF (Cross-Site Request Forgery)
- If you use cookies to authenticate any time your browser sends a request to your site those cookies are sent (with a few exceptions). CSRF is the risk that after a user has authenticated to your app a malicious site could trick the user into clicking a link and submitting a request to the server that they did not intend to send. Because the request is going from an authenticated user client with authenticated cookies and going to the server backend it will be accepted. For a comprehensive explanation of CSRF and recommended best practice refer to OWASP CSRF prevention cheat sheet
Client side permissions
- Because this is an SPA everything in the UI is either generated by data requested from the API server or generated programmatically on the client. Some form of permissions need to be passed to the client in authentication to render the correct UI. Because anything on the browser could be manipulated, the permissions on the client cannot be trusted to determine what data it can access from the server.
Cookie size
- Some solutions to the permissions problem require larger cookies. As the cookies become larger at a certain point they can impact performance. For example a more granular permissions model that authorizes individual resources can grow to into kilobytes. There is a limit of 4kb per cookie. Cookies are sent with every request to the server, and because of the asymmetric speed of upload vs download they can have an even larger effect on the performance than you might expect (i.e. downloading 4kb of data is much faster than uploading a 4kb cookie in every request). Large cookie performance impact describes this in more detail.
Local Storage
- Some people use local storage to store the JWT and included it in the header of each request sent to the server. Recommended best practice is not to store authentication tokens in local storage because of the risk they can be stolen.
Expiration
- There needs to be some way to blacklist or expire tokens once they are created. Without taking other steps to enable expiring tokens the only option available would be to change the servers key used to sign all the tokens. This is really the nuclear option because it immediately invalidates every JWT token and forces all users to login again.
A Real Solution
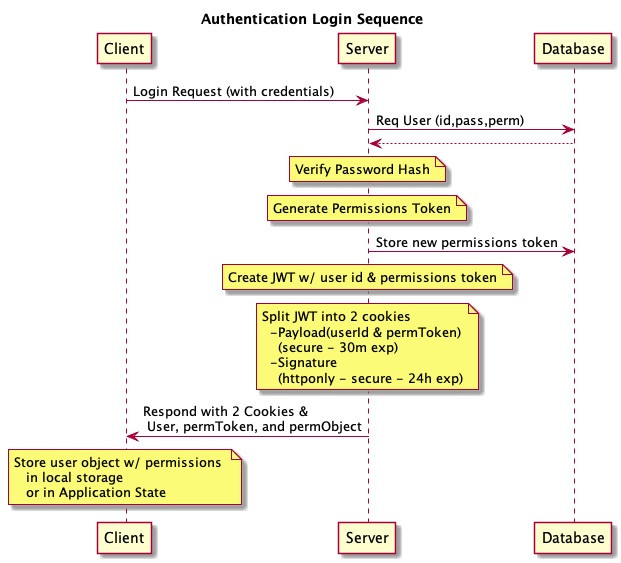
The architecture below addresses the problems above with a more complete solution.

Here are some of the important features:
Split Cookie If we use an
httponlycookie to store the JWT it prevents the cookie from being read (or stolen) by any javascript on the page, but this also makes it impossible for our app to read the cookie to use anything from the payload. To solve this the JWT is split in half, separating the signature and the payload. The payload is then sent as a standardsecurecookie that can be read by the client to see if the user is logged in. The signature is sent in ahttponlycookie. Both cookies are sent with any request. The server stitches them back together and verifies the token is valid. This ensures the client has access to the payload (which it needs), but it cannot read the signature preventing it from being stolen and used by an attacker to authenticate themselves. You can read more about this "split cookie" approach here and herePermissions object in local storage If app permissions object are simple (i.e.
{role: "ADMIN"}) the cookie would be small, but with more granular permissions where individual resources and actions are individually authorized (i.e.{policies:[{USER-INVENTORY-CREATE}, {TEAM-INVENTORY-READ}, ...]}) the cookie data for client side permissions can get large. This results in a large payload for the JWT if the permissions are put in the payload. The solution is to return the permissions object in the login response rather than in the JWT token. The client then stores this permissions object in local storage. This allows the client to use the permissions to shape the UI while not exposing the authentication token to being stolen. It also means the data in the permissions object is only sent at login and does not get sent with every request.Permissions Token In order to invalidate previous JWT's we set a permissions token at login. It is used to reference the state of the user when the JWT was created. This is just a cryptographically secure random number that is stored with the user in the database and returned to the client in the payload cookie. Every time the user sends a request to the server that permissions token is compared with the one in the server and if they don't match the request is denied. This token serves three functions:
Permissions Change If a users permissions are changed on the server the token changes and the very next request by the user will force them to login again to refresh their permissions. This way if an administrator removes access to some data the changes will take effect immediately. Otherwise they might stay authenticated for hours or days with stale permissions that no longer match their account.
Blacklist old tokens To force a user to authenticate again for any reason. If there is any indication the token was stolen, or the user changes their password you would want to invalidate any previous tokens. Simply changing the permissions token on the backend ensures that any old tokens are no longer valid.
CSRF token One defense against CSRF is to use a unique random number generated at login. When a request is sent to the server (or just certain critical requests) that random number must be included with the request and compared to what is stored in the server. This works because even if a user is tricked into clicking a link to submit a request with their cookies the attacker will not know the token number (unless they have compromised it already in some other way). This is often called a CSRF token. Because this token is stored in the database it is not truly stateless.
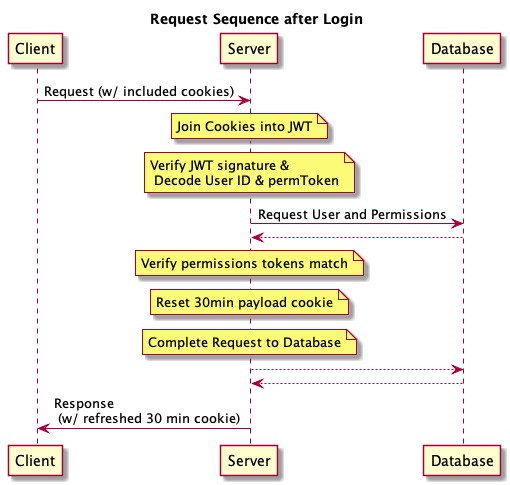
The sequence below shows a request after logged in. This also shows timeout if the user is idle for more than 30 minutes. The two split tokens are set with different expirations. The payload token will expire in 30 minutes if not renewed. Any server request that succeeds refreshes the payload token with a new 30 minute window meaning that if the user performs some activity every 30 minutes they will not be asked to login again.

